Showing posts with label review. Show all posts

Wednesday, 15 October 2014

NEW Sparkle Baby palette from Sugarpill First Impression and Swatches

I went to IMATS (International Makeup Artist Trade Show) a few weeks ago here in Sydney. I am a freelance makeup artist and I went to stock up on things for my kit. I pretty much got everything I needed and picked up a few more goodies I wasn't expecting to get but had to jump at the chance at getting them while I can (will do an IMATS haul post if you would like to see what I got and why)

So anyway I knew I wanted to get a few loose pigment eyeshadows from Sugarpill. Had seen so many photos on the internet of looks using them. I lined up for 50 minutes to finally reach the Sugarpill counter (normally I wouldn't do this and I didn't for MAC) but this was the first time Sugarpill came to Australia so I had to.
Anyway I got a few loose pigments, a few had already sold out :( but I then saw Kitten parade the prettiest pressed eye shadow I have seen then saw it in the Sparkle Baby palette, I had saw this on Sugarpills Instagram page the night before IMATS but had expected it to sell out....... BUT IT HADN'T!!!! So I had to get it.


This is SOOOOOOOOO pretty, the packaging is really cute....... but look at the the colours in this Palette.How stunning are they? I wasn't sure if I would use all the colours together in a look but I would use them with other products to achieve a look especially Kitten Parade.


Kitten Parade: Soft peach colour with a gold shimmer. Looks amazing on blue eyes. Awesome colour to wear alone over the entire lid


Frostine: Very pretty lilac colour. Colour is very soft and pastel like but is more pigmented if worn over the top of an eye primer


Candy Crush: Soft aqua shade with a little silver shimmer. Stunning pastel shade.


Hotsy Totsy: Bright hot pink and has a little blue sparkle to it. This is the brightest shade of the four and I was worried I couldn't work this colour into a look using the other shades, but I was wrong.


I have played around with the palette and used all the colours in a few different looks. I didn't think I could pull of looks using the four colours but I can and I think they are so pretty.


To recreate this look:
Apply Kitten Parade over the entire eye lid and blend up into the crease. Using a small tapered brush I then applied Hotsy Totsy into the crease and blend up towards the brow. Apply more Kitten parade onto the eyelid.
On the inner corner and the brow bone I applied Frostine.
Along the lower lash line I used Candy crush.
I finished the look with a black winged eyeliner, mascara and then false lashes.


To recreate this look:
I applied Candy Crush over my eye lid and blend it into my crease. I then applied Hotsy Totsy in my crease and blended up. I then pressed Sugarpills Lucid loose pigment over the top of Candy Crush to intensify the colour.
 I  applied Frostine on my brow bone and inner corner and Kitty Parade along my lower lash line
Apply black liner along my top lash line and coat my lashes with Mascara and apply Fake lashes.

And the last look is the easiest


I kept this look simple as it was the first look i did do using the palette. But I applied Kitten Parade over my eyelid and blended it up into my crease. I then applied a loose soft gold shimmer into the corner of my eye
 I applied mascara. I was and eyeliner to top and bottom of my lash line and then lightly applied Kitten parade along my lower lash line


I really am impressed with how versatile these colours are. I am still trying different looks so if you want to see more follow me on instagram: @claudaciousmakeup

Until next time xox


Claudia

Wednesday, 24 September 2014

New Australis Velourlips swatches and reviews

The new shades from the Velourlips range by Australis arrived in Priceline stores two weeks ago and the colours are stunning. I remember the first collection of Velourlips and bought a few but they were very bright and unwearable for everyday use so they have sat in my draw for months and get pulled out on the odd occasion when I am wanting a bright intense lip.


But I am excited for these new shades which are perfect shades for spring. Soft pretty pastels


The formula to me seems so much more improved. The old ones I felt stained your lips badly even with makeup remover they were difficult to get off and felt really drying on my lips. These new shades are so much easier to remove. They are a soft creamy liquid that dries matte on the lip very quickly and last for hours.


Lun-dun:  A pretty pastel lilac, think this will be a popular colour


Ho-chee-min: Yellow toned baby pink colour


Mi-a-mee: Brightest colour from the range. Its a bright coral red


Hon-o-loo-loo: Deep beige dusty pink colour, one of my favourites love this as a nude


Mil-a-no: Nude beige shade. On me this colour looks like I have just put concealer/foundation over my lip. Was also the patchiest of all the colours


These colours along with the first velourlips collection retail for $9.95 which is very well priced.

would love to know what you think of them and what's your favourite colour


Until next time
xox

PS to keep up to date with products I'm loving, wearing or different makeup looks

 you can find me on Instagram: @claudaciousmakeup
Facebook: www.facebook.com/claudaciousmakeup


Sunday, 21 September 2014

Bondi Sands Self Tanning Foam Review

Summer is fast approaching and I can't wait. Sun, beaches, summer, clothes, and warmer weather. But for people like me who are so pale that when we are out in the sun we burn and go bright red and peel. Summer can be a nightmare. I wear sunscreen whenever I am outside to protect my skin from sun damage.

 I use to envy the girls with the golden tan.......Until a friend introduced me to Bondi Sands fake tan.


So I have now been using Bondi Sands Light/Medium Self Tanning Foam for over a year now and I haven't looked back.

The Bondi Sands foam is great for people like me (Non tan experts) Easy to apply, colour is amazing and smells so good.

This tan is blue/green based so there will never be an issue with an orange oompa loompa look about you  Even when the tan is developing I can go out and not feel like everyone is looking at me and knows that I have "just" faked tan. I also love the fact that I can apply 2 light coats of the tan sit in my dressing gown apply my makeup and then get dressed for work and the tan is dry (just avoid light coloured clothes while the tan is developing) A big bonus is the smell. It has a really nice scent of coconuts, my boyfriend has told me the smell reminds him of his Nan's biscuits.


PREP THE SKIN

I shave my legs the day before and exfoliate
It's important to remove any dead skin before applying fake tan so it doesn't look patchy and looks even and flawless. Just avoid an oil based exfoilater as the oil can create a layer between the tan and your skin making it harder for the tan to grab.

APPLYING THE TAN

I apply two pumps of the foam onto my tanning glove and then using circular motions I blend onto my skin. I normally like to start with my legs and work upwards. I only choose my legs first so they dry quicker so I can then sit down sooner after I apply it.
Apply a light coat all over legs, leave the knees to last and use whatever is left on the glove to rub over the knees. The knees, elbows ankles, feet and hands are the driest areas of the body and will soak up more tan which will make them darker
I wait an few minutes until the first layer is almost dry and apply another coat.


LETTING IT DRY

I find the foam dries quiet quickly I wait at least half an hour before applying clothes but I wear a dressing gown around the house while it dries.
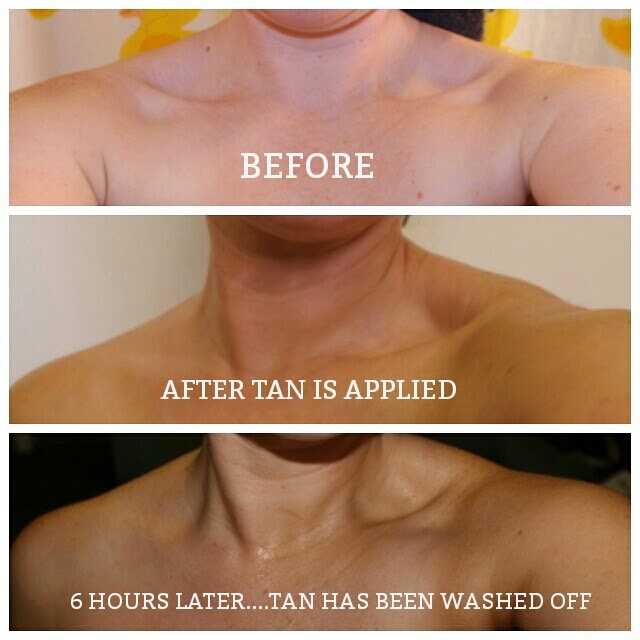
 Best thing about this product is that the colour is instant and for a light natural tan it can be washed off after an hour or left for up to 6 for a darker longer lasting tan.


AFTER 6 HOURS

So I normally like to apply this first thing after my shower in the morning and then wash it off at the end of the day. Or I apply it at night and wash it off the next morning. I wash it off and use a body wash to remove any excess. When I get out of the shower I pat myself dry and then apply a hydrating moisturiser all over my body.
I make sure I moisturise morning and night while I have fake tan on ( I use St Ives 24 Hour Deep Restoring with Almond Oil)


HOW IT WEARS

Bondi Sands Foam for me wears really well. It can look a little patchy in some areas after about 4-5 days but mostly in areas like my cleavage or under my arms, so not obvious areas like my arms stomach and legs. It fades evenly and then I soak in baby oil and exfoliate the rest off.


BEST BITS

This is Australian made
Comes in a 200ml Pump bottle
Very affordable at $19.99 at Priceline (but they do have it on special a lot)

Until next time
xox

PS to keep up to date with products I'm loving, wearing or different makeup looks

 you can find me on Instagram: @claudaciousmakeup
Facebook: www.facebook.com/claudaciousmakeup

Sunday, 10 August 2014

Younique 3D Fiber Lash Mascara

Hi everyone...... I have recently received the Younique mascara to try and wanted to share my thoughts about it with you, but before I do I feel like I need to have a little rant and get it out of the way

If you are familiar with social media especially Instagram and either have or follow a few beauty/makeup pages I am sure you would have come across this brand. I have seen lots of photos of people trying the mascara and was really impressed and wanted to try it. But I have come across some rude and pushy representatives for this brand which made me avoid even trying to contact someone about it. I personally don't like them spamming my photos trying to sell the product. A few have been pushy (maybe not intentionally) and I think its unprofessional. I understand that these people are trying to run a business and make money but there are other ways. I was contacted by a few representatives via email who were lovely and professional.
(Younique is a similar concept to Avon - seller earns commission/income from selling products)


Like I said I had really want to try this product, all the photos I had seen looked great and made a massive difference, but every photo I had seen was from someone that had connections with the brand. So here is my review of the mascara with no strings attached.


First Impression: Packaging was stunning from the actual parcel itself and then inside with the tissue paper. Unwrapping the tissue I found a black case, inside were two matte black tubes. Moodstruck transplant gel and Moodstuck natural fibers.


To apply: Concentrate on one eye at a time. Start with applying the transplant gel (mascara) onto your lashes like a normal mascara. Then coat the tips of your lashes with the fibers. I applied 2 layers of both and was happy with the look, I could have gone another layer but was worried my lashes would start to look spidery.


....... well it's been over a week and I have worn the mascara everyday and it's worn really well. It hasn't smudged or flaked and they look so long all day. Removes really easy at the end of the day with makeup remover. I use Bioderma Crealine H20 solution micellaire cleanser. It has taken me a little longer to do my mascara in the morning, so I would prefer to do wear this on weekends, when I had more time to get ready or for special occasions where false lashes would be a bit too much.

As you can see from below I have shown you before mascara
One eye with the mascara and one without
And then both eyes completed


After everything I think it's a really good mascara. My lashes do look amazing and long without looking spidery. I am just disappointed that the representatives are tarnishing the brand and spamming makeup/beauty accounts on social media and turning people off the brand before they even try the product.
Having said that I have gone through Jenn Sherrer via email and she has been so professional and helpful and polite. If you do wanna get your hands on this mascara and try it yourself contact her

www.youniqueproducts.com/JennSherrer/party
jennsherrer.yp@gmail.com

Take care
Until next time xox